Getting started
We'll guide you through these 4 easy steps to use your Sentinel Core as Home Assistant server with local AI voice assistant:
1) Choose your hardware
2) Hardware assembly
3) Home Assistant onboarding
4) Choose your AI Voice Assistant
Building the foundation
Transform your Sentinel Core into a powerful AI home server by pairing it with a few essential components of your choice.
Selecting your AI engine
The first decision in this build is to select the engine that powers your AI: the GPU. Whether you’re giving new life to an used card or upgrading to something fresh, there are a few simple things to keep in mind:
We recommend AMD Radeon RX 6000 and 7000 series GPUs for their exceptional price-to-performance ratio and dependable open-source Linux drivers. An 8GB VRAM card is great for getting started, but 16GB or more lets you explore larger, more ambitious models.
You are of course encouraged to try other GPUs from the Raspberry Pi PCIe Database, or share your results for cards not listed, to help grow the community’s knowledge.
Finally, keep the GPU’s idle/maximum power and its physical size in mind, as these will influence your choice of PSU and case.

Find the perfect fit
With your GPU selected, it’s time to house your build in a case that suits both style and substance. If you already have an ATX case, it can easily accommodate a Mini-ITX board. However, if you’re eyeing a new Mini-ITX case, keep these tips in mind:
GPU fit: Check that your case can handle the size of your GPU, both in length and height. Many modern GPUs are over 25cm long and take up two or more slots, which may exceed the capacity of some Mini-ITX cases.
PSU type: Determine whether the case requires an ATX or the more compact SFX power supply.
Cooling options: Look for the number of case fans included or supported. The Sentinel Core can power up to two case fans, so you can keep your setup cool and efficient.

Delivering the power
The last piece of the puzzle is your power supply unit (PSU), that suits your GPU and case:
Case compatibility: Check whether your case requires an ATX or SFX PSU.
Wattage: Make sure the PSU's 12V output comfortably exceeds your GPU’s maximum power draw. (The Pi’s 5V usage is negligible in comparison.)
Connections: Confirm there are enough 6+2 PCIe power connectors for your GPU—some SFX models may fall short.
Other features you might want to consider:
Detachable cables: A modular PSU allows for cleaner cable management.
Efficiency ratings: 80 Plus or higher certification often means better power efficiency.
Low idle power: An efficient PSU reduces idle power draw, saving energy when the system isn’t under load.
Silent operation: Look for 0 RPM fan control to keep things whisper-quiet.

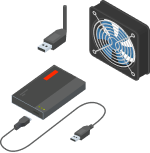
What else could you want
Once your Sentinel Core is up and running, you can customize and enhance it with a few optional extras to suit your needs:
Storage: Planning to store large media libraries or AI models? Consider adding a USB 3 hard drive.
Connectivity: Expand your setup’s capabilities with Raspberry Pi HATs or a ZigBee dongle for seamless smart home integration.
Silent fans: Keep things cool and quiet by upgrading your case fans to ultra-silent models for a more peaceful environment.
Where the plan comes together
With all your components ready, it’s time to assemble your AI home server. While your case manual will provide specific instructions for your model, the general process typically includes these steps:
Putting it together
Remove the side panels from your case.
Secure the power supply unit in its place using the screws provided with the case.
Ensure the rear cutout of your case is able to align with the Sentinel Core's ports. If your case includes a cover or bracket for this area, install it now.
Mount the Sentinel Core in the motherboard location using the included standoffs and screws.
Connect the 24-pin power cable from the PSU to the Sentinel Core.
Attach the case fans to the 4-pin fan connectors.
Connect the power button and status LEDs to their header pins.
Remove the necessary metal slot covers (expansion slots) from the back of the case to make room for your GPU.
Plug the 8- or 6-pin PCIe power cables into the GPU.
If using a PCIe riser, insert it into both the Sentinel Core and the GPU.
Carefully install the GPU into the PCIe slot or riser, aligning it with the expansion slots.
Close the side panels to complete the assembly.
Congratulations—your AI home server is now ready for the next step!

First-time setup
Your Sentinel Core comes preinstalled with Home Assistant, so once assembled and powered on, you’re ready to begin. Just follow these steps to onboard Home Assistant and you are ready to start automating your home.
Using the login wizard
Connect Sentinel Core to a wired Ethernet connection.
Press the power button to turn it on.
Open a browser on another device in your network and go to: http://homeassistant.local:8123/
Start a new installation by creating a user account, or restore from a backup.
Enter the location of your home on the map.
Choose if and what data you’d like to share with Nabu Casa.
Review any automatically discovered devices and continue to your dashboard!

Choosing your AI voice assistant
Sentinel Core comes preloaded with GPU drivers and Home Assistant, but you are completely free to choose your Voice Assistant setup.
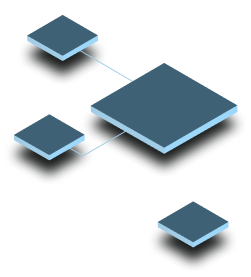
A complete Voice Assistant setup consists of several key parts:
LLM runner: Llama.cpp
Speech to text system: Whisper
Text to speech system: Piper
LLM integration: Extended OpenAI conversation
Speech integration: Wyoming
Voice Assistant configuration
Adding the building blocks
Start by going to settings -> Add-ons -> Add-on store. From there install:
Piper - text to speech
Get HACS - the installer for the The Home Assistant Community Store
Llama.cpp - LLM runner
Whisper.cpp - speech recognition
Sanctuary Updater - to update our GPU enabled operating system fork
Our fork already comes configured with the HACS add-ons repository and our very own LLM add-on repository.
Start Llama.cpp, Whisper.cpp and Piper, and make sure "start on boot" is checked.
If you want to check and install operating system updates, start Sanctuary Updater.
Start Get HACS and then switch to the logs tab and follow the instructions, which will prompt you to restart Home Assistant.

Making everything work together
Now head over to Settings -> Devices & Services -> Add Integration, search for HACS, and install it.
Go to the new HACS icon in the side bar, search for Extended OpenAI Conversation, and install it. Don't worry, we'll change the settings so it connects to llama.cpp instead of OpenAI.
Now head back to Settings -> Devices & Services. Either Wyoming has detected Piper and Whisper.cpp or you need to add them yourself:
If they are detected, just hit the "Add" button.
Otherwise, select Wyoming Protocol and from there use "Add service" button to configure the integrations we'll need. Just enter the host and port, and hit "submit":
Piper, host: localhost, port: 10200
Whisper.cpp, host: localhost, port: 10303
Now configure Extended OpenAI Conversation: Settings > Devices & Services > Hit the "Add intergration" button. Add "Extended OpenAI Conversation" with these settings:
Name: llama.cpp
API key: dummy
Base URL: http://localhost:8765 (so it uses llama.cpp locally on the Sentinel Core)
Version: leave blank
Organization: leave blank
Skip authentication: no
In the configuration (Settings > Devices & Services > Extended OpenAI Conversation > ⚙️), change:
prompt template: customize the personality as you like
chat model: a HuggingFace repository name like NousResearch/Hermes-3-Llama-3.1-8B-GGUF
Maximum tokens to return in response: 300 (increase if you get an error about response length)
tool use: enable
Giving it a voice
This is where it all comes together. In Settings -> Voice Assistants select the existing "Home Assistant" and configure the following items:
Conversation Agent: llama.cpp
Speech-to-text: whisper.cpp
Text-to-speech: piper
Then head over to the "Expose" app and select the entities you want you AI to be able to see and control.
That's it! You can now chat with you AI from the assist menu in the top right of the dashboard. For using your microphone it is best to use the mobile app.
From here you can explore different models, different voices, and pair microphones like the Home Assistant Voice, FutureProofHomes Satelite1, or Wyoming Satelite.

The system at a glance
Home Assistant has quite a complex menu, so here is where you find all the different settings and components at a glance
Settings
Devices and Services - glue between Home Assistant and add-ons and other things
Extended OpenAI Conversation
Options (⚙️)
The prompt / personality of your assistant
The large language model used from HuggingFace
Functions your model can call (examples)
Add service
API key: anything
Base URL: http://localhost:8765
Wyoming - configure the connection to the voice related add-ons
Voice Assistants - configuration of the whole pipeline
Assistants -> Home Assistant
Conversation agent: the integration to use (Extended OpenAI Conversation)
Prefer Handling command locally: try the default rule based assistant before sending the prompt to the (also local) LLM.
Speech to text: whisper.cpp
Text to speech: piper
Language & voice: select the model to use for TTS
Add-ons - independent software components
Add-on store - install and update add-ons
Llama.cpp - LLM runner
Logs: watch LLM status and any possible errors
Whisper.cpp - speech recognition
Configuration: voice model, language
Logs: watch voice recognition status and any possible errors
Sanctuary Updater:
Configuration: force update
Logs: see version check status and update progress