How to reinstall the Operating System
Download our GPU-enabled Home Assistant fork: Dowload HAOS v16.0
What you’ll need
To flash the Compute Module eMMC, you need the following:
Another computer, referred to in this guide as the host device. You can use:
Linux (we recommend Raspberry Pi OS or Ubuntu),
Windows 11,
or macOS.
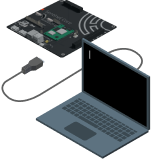
The Sentinel Core
a USB-C cable
Tip: In some cases, USB hubs can prevent the host device from recognising the Compute Module. If your host device does not recognise the Compute Module, try connecting the Compute Module directly to the host device. For more diagnostic tips, see the usbboot troubleshooting guide.
Set up the Sentinel Core
To begin, physically set up your Sentinel Core.
Disconnect the Sentinel Core from any cables, including the 24-pin ATX connector.
Fit a jumper on header J2 on pins nRPI_BOOT (disable eMMC Boot)
Connect a cable from USB-C slave port J11 on the Sentinel Core to the host device.
Set up the host device
Next, let’s set up software on the host device.
To set up software on a Linux host device:
Run the following command to install rpiboot (or, alternatively, build rpiboot from source):
$ sudo apt install rpibootMake sure the USB-C cable is connected.
Then, run rpiboot:
$ sudo rpibootAfter a few seconds, the Compute Module should appear as a mass storage device. Check the /dev/ directory, likely /dev/sda or /dev/sdb, for the device. Alternatively, run lsblk and search for a device with a storage capacity that matches the capacity of your Compute Module.
Tip For a host device, we recommend a Raspberry Pi 4 or newer running 64-bit Raspberry Pi OS.

Flash the eMMC
Download our newest GPU-enabled Home Assistant fork img.
Use dd to write the raw OS image to your Compute Module. Run the following command, replacing /dev/sdX with the path to the mass storage device representation of your Compute Module and raw_os_image.img with the path to your raw OS image:
$ sudo dd if=raw_os_image.img of=/dev/sdX bs=4MiBAlternatively you can use Raspberry Pi Imager to flash a generic operating system image to a Compute Module.
Once the image has been written, disconnect and reconnect the Compute Module. You should now see some partitions. You can mount the partitions normally if desired.
Boot from eMMC
Turn off the Sentinel Core and disconnect the USB-C cable
Disconnect nRPI_BOOT from J2 (disable eMMC Boot) on the Sentinel Core
Reconnect the 24-pin ATX connector and reconnect your GPU and any other peripherals.